Thursday, March 19, 2015

Knots - Handcuff knot

Introduction

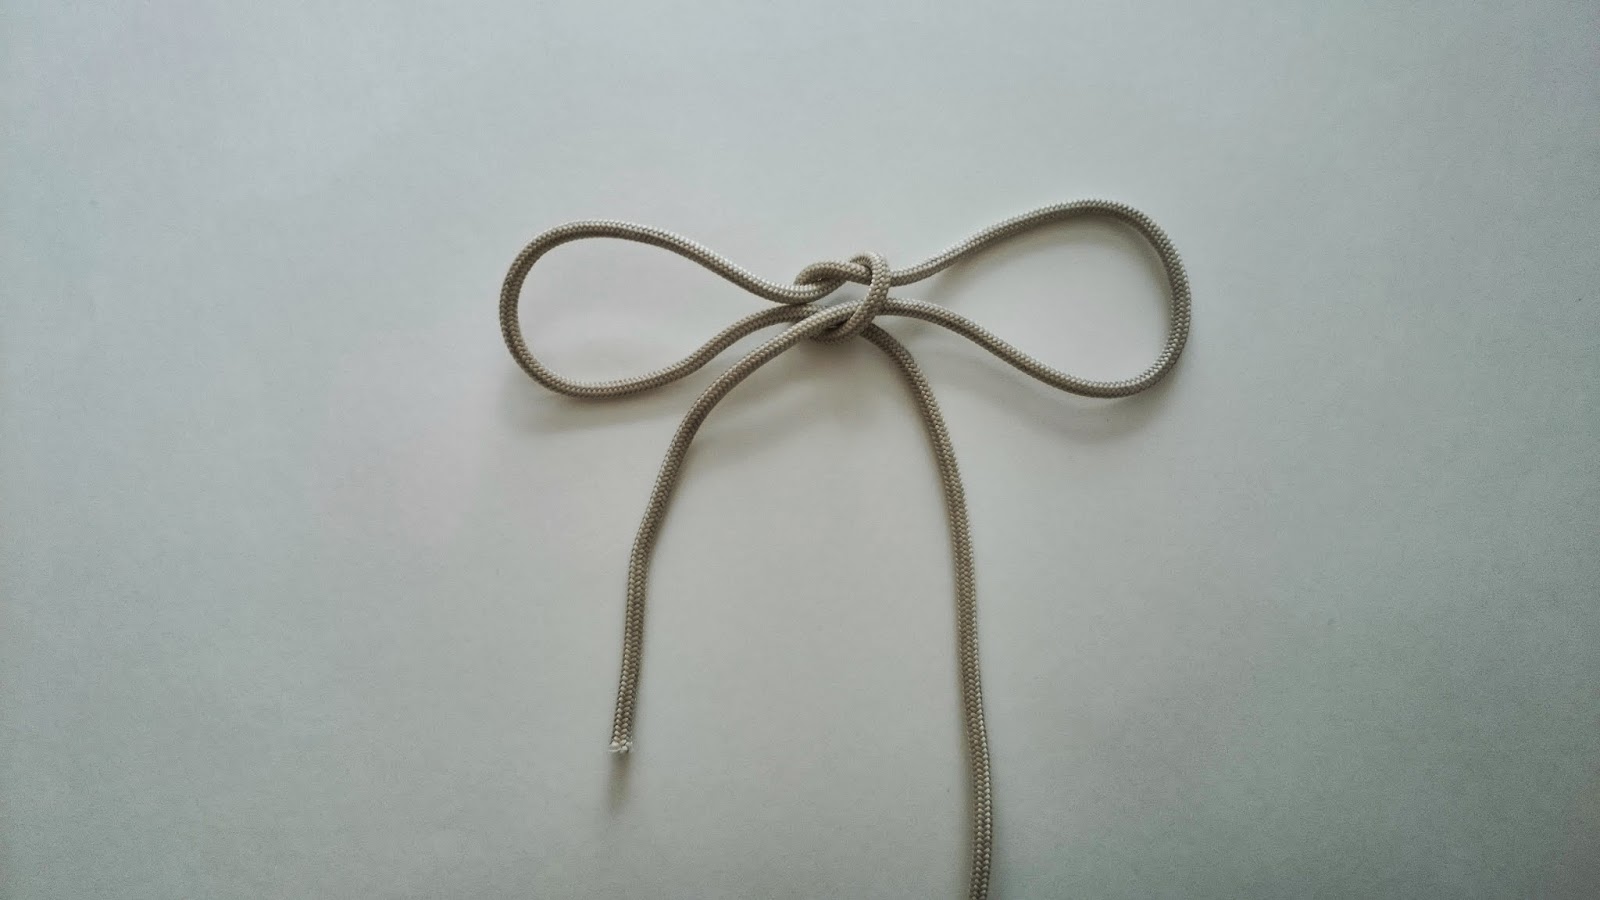
Finished handcuff knot
Handcuff knot

As the name implies, the handcuff knot can be used to bind the hands or feet of your adversary. It is also known as a "hobble knot".  It isn't very practical but it is sure fun! It is a Slip Loop type of knot.

With my Scout group this knot is always the first one that I teach when I am introducing knots because it is easy to make a game of it. It gets them interested in the subject of knots (which can be a challenge). What kid doesn't want to capture a friend with handcuffs as part of a cops and robbers game?


Tying the knot

Animated handcuff knot


  1. First, make a butterfly shape with your hands, with the rope hanging across the middle of the thumbs
  2. Slide your hands apart a bit
  3. With your right hand fingers, pick up the rope on the left hand and pull it up and through. Keep the bight of rope between your fingers!
  4. With your left hand fingers, pick up the rope on the right hand and pull it up and through. Keep the bight of rope between your fingers!
  5. Now finally, pull the two bites apart and let the loops form in the rope.
  6. Hold the two working ends tight so that the handcuff stays tight. 
The knot can be locked by tying a half hitches around each of the loops using the working ends. This is also referred to as a "Fireman's chair knot".

The game

The game that we played with the handcuff knot is basically a modified version of freeze-tag. The object is to capture all of the "robbers" as quickly as they can. 

Pick a few kids to be the "police" and give them rope (approximately 1m long).  The police need to tag a robber and then the robber has to freeze for the count of 5 seconds. If the police can't tie the knot in 5 seconds the robber gets away and the police need to untie the rope and start again.If the robber is captured they are out until the end of the game.


As the kids get better at tying the knot you can reduce the number of seconds they have. Believe me, they will get very quick at it!

Knots - Bowline

Source: http://www.animatedknots.com/bowline/


The bowline is one of the most basic sailing knots and is almost universally used for attaching sheets to sails. It is generally useful in situations where a loop is needed in the end of a rope. It can be tied by itself or around an object.

It is normally the 3rd knot that we teach our scouts (behind the handcuff and square). I have used it extensively camping and in many ways around the house. 

The bowline is highly reliable, except with slippery rope. Poor quality nylon rope tends to slip and come apart. 

Tying

The mnemonic for tying the bowline is:
"The rabbit comes up through the hole, around the tree and back down the hole." 

The basic steps are:
  1. Create a bight in the rope (around an object if desired)
  2. Create a loop in the standing end of the rope
  3. Put the working end through the loop
  4. Bring the working end around the standing end
  5. Bring the working end back through the loop
  6. Tighten


Knots - Figure-eight


Regular Figure-eight


The figure eight knot is a foundation knot that is useful in many situations. In its primary form it is simply a stopper knot. IE, a knot that creates a stopping point in the rope when it is travelling through a hole of some sort. 

In sailing, a figure-eight is often used at the end of a line (for example a jib sheet) to keep it from escaping through its block (pulley). It is used similarly in rock climbing.
Source: http://www.boatus.com/

While many knots are known to cause a degradation in the strength of the rope that it is tied in, the figure-eight fairs pretty well in this respect. It causes a reduction of 20% from the original breaking strength.


Tying the knot

Animated figure-eight
Animated Figure-Eight
  1. Make a "loop" by crossing the working end over the standing end
  2. Continue the working end around the standing end a full turn to make an "elbow"
  3. Bring the working end back up through the loop
  4. Tighten as needed

"Figure-eight on a bight"

The figure-eight on a bight is used any time that you need a strong loop tied in a rope and it doesn't need to be adjusted regularly. The figure-eight on a bight is strong and easy to tie.

Source: http://www.canyoneeringusa.com/

Tying the knot

Use the exact same technique as above. However, before you start, double the rope back on itself to create a loop. Treat the loop as if it was a single rope and tie the figure-eight as you did before. You will be left with a loop in the end.

"Figure-eight follow through"


The "figure-eight follow through" is a form of the figure-eight that is often used in rock climbing as a way to tie into the the harness since it is:
  • Easy to tie
  • Easy to verify that it is tied correctly
  • Doesn't reduce the strength of the rope considerably
  • Doesn't slip
Once tied it is identical to a "figure-eight on a bight" (above) but is tied differently because it is often used around a closed object (like the anchor ring on a harness)

Tying the knot


  1. Start with a figure-eight tied at least 30cm up the working end of the rope
  2. Bring your working end around whatever object the rope needs to be fastened to
  3. Feed the working end back into the top of the figure-eight
  4. Follow the exact same path backwards through the knot. Make sure that you keep the working end tightly following the existing knot path. 
  5. Exit the knot through the standing end side of the knot
  6. Tighten
  7. Lock with half hitches, if required
Animated Figure-eight follow through

Tuesday, March 17, 2015

BoatLogger - iframe issue


Integration of BoatLogger into this site has been a goal of my BoatLogger experiment. Since I want to maintain a single online presence, it is one of the high value aspects of the service. 

Inserting a datapane into a website should be easy. You simply click on "Copy URI", select the code and paste it into your HTML of your blog/site. Easy, right? Unfortunately, from the start, I have had issues getting the data panes to display properly in Internet Explorer.

The basic symptom that I was experiencing was that the iframes would display correctly in Chrome or Firefox but not in Internet Explorer. 

There would be no error, they just wouldn't display. 


Chrome iframes
IE Not displaying iframes
After a LOT of digging into a variety of weird IE iframe eccentricities, I finally discovered the issue...and it wasn't specifically an IE or a BoatLogger problem!

The template that I currently use in Blogger is based on the "Simple" template. In the head of the source code of the template is this META tag:


And it is as simple as that... IE is being forced to think that it is an earlier version that isn't compatible with the iframe content. 

Removing that tag has fixed the problem and it hasn't seemed to have broken the site template. I assume it is there to resolve some specific issue that the template designer was facing. 

While I'm happy that I've resolved the issue, it has shown an issue with the BoatLogger service, their support forum doesn't receive any attention. After 2 weeks of the issue being outstanding, I received 5 views on the forum but no response. Even a "We're not sure but we'll think about it." response would have been more reassuring than nothing at all. 


They seem to think they have good support, judging by the dialog box shown above. I've just submitted a direct question about a problem I've had paying for the service. We'll see what the response is for that...I expect it will be quicker.


Monday, March 16, 2015

Winter fire starting

Starting a fire in deep snow can be an intimidating chore, but it doesn't need to be. This past weekend, at a scouting event, I kept myself busy while the scouts were doing activities by building this fire. 
First I put a layer of 4" wood on the bottom, tightly placed. This layer acts as as a retention layer for the heat and coals until the fire is going well. Eventually it will burn through but at that point you will have a good layer of coals and ash that will keep the fire lit. 

Second, I added a top border of 2" wood around the edge of the fire. This helps to keep the fire in place and retains the coals a little better. 

Last I built the fire using "old man's beard" as a tinder, followed by progressively bigger twigs and then branches. The twigs and branches were from a nice and dry standing dead spruce. 


The fire will continue to melt down until it his the ground, it took approximately 4 hours for the fire to make it's way to the ground in this case. There was approximately 1m of snow. 


Friday, March 6, 2015

Boatlogger.com - First Impressions

The simplest way to keep track of your boat activities is using a traditional paper log book. But, I'm a geek and using paper to track anything isn't appealing. Whether or not I actually look at it again, I like to have the ability to track, calculate, re-post or reference my data without flipping through a paper log.

So, I have been looking for a good electronic replacement for tracking boat information for a while. There are several phone apps, websites and thick client applications that have this goal but none have struck my fancy until BoatLogger.

Now, BoatLogger is definitely a beta product at this point. There is still a lot of glitchiness in the site but I see promise in the service and I'm betting that, if they can survive long enough and get enough users early on, this site is going to become the default platform for this type of tracking.

What are the killer features of BoatLogger?

  1. Easy of customization - Every aspect of a yacht site can be customized. For those who will be using the service as a primary boat site this is a great feature. For those of us (me included) that will be using it more as a utility service to back my own site, the customized look doesn't get in the way.  Adding data fields is easy and most data panes are customizable.
  2. Reasonable default functionality and look - Out of the box the system is fairly nice looking and functional. This will be important to the non-geek users that aren't interested in a customized experience. 
  3. Good map-enabled log book - I haven't spent much time yet with the logging feature (ice doesn't make for good sailing!) but I look forward to trying this extensively this summer and reporting back. The logging functionality appears to be flexible and functional. Time will tell. It does also give the ability to import GPS data from other sources. Nice feature.
  4. Mobile app (Android) - While I haven't spent a lot of time with it yet, it does seem to have all of the basic features needed for a log. More on this in a future post. 
  5. Support for GPS tracking devices - The ability to tie into a SPOT or inReach tracker is a great feature. These devices tend to be more reliable than a phone. 
  6. Ability to embed data in external sites - For me this feature is important. Since www.afloat.ca is my primary online location, it is important that any service I use integrates into the site. I like the idea that I can use BoatLogger as the data repository for my data and then integrate it directly into my Blogger site. There seem to be a few integration issues but I am confident that this will be a great feature once the bugs are ironed out. 
  7. A strong roadmap - If the developers at BoatLogger deliver on half of the features that they have planned it is going to be a killer site. Things like instrument integration really are the holy grail of boat management. 
The BoatLogger site also has features for race and flotilla tracking. I haven't explored those yet but they seem like interesting concepts. 

I look forward to seeing where BoatLogger goes. I'm sold on the concept and I'm willing to put my money where my mouth is. The more people start using the service the more likely it is that it will succeed. Give it a try, you might be pleasantly surprised at what they have going on.