Sunday, December 22, 2013

Atomic 4 rebuild - Helpful resources

As I go through the rebuild process of my engine I will use this post to keep track, and propagate, useful information sources and links.

General Links

Moyer Marine - The definitive source of parts and information about the A4.

The Atomic Four Marine Engine  and  Replacements - http://pearsonvanguard.homestead.com/files/atomic4.htm

Atomic 4 Manual [Download]
Alberg 30 site- The Care and Feeding of the Universal Atomic Four Engine

Atomic 4 rebuild - removing manifold and accessory brackets

The manifold is held on with three threaded pins with 9/16" nuts, these nuts are missing from mine.
Atomic 4 manifold removed
Manifold removed
 There is a gasket behind the manifold. The gasket appears to be in reasonable shape but I will probably replace it.
Manifold gasket
Manifold gasket
 The manifold is in fairly rough shape. It has been previously repaired, there is some rough braising along the top-front. I will explore the part more thoroughly before deciding on replacement or re-use.
Manifold
Atomic 4 Manifold
I removed 3 other brackets at the same time:
  • Side alternator bracket (the alternator was not installed when I got the engine) - One 1/2" bolt holds this on.
Atomic 4 Alternator bracket
Alternator bracket
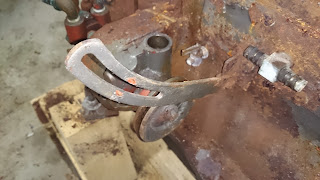
  • Some sort of bracket at the back that I'm not sure what it was use for. This was bolted to the back with two 1/2" bolts (2" long). I may or may not replace this depending on what it turns out to be for. 
Miscellaneous bracket at back. What is it?

  • Top alternator bracket - This bracket is held on by two 11/16" nuts on threaded studs. One of the bolts broke off while removing. I will have to remove and re-tap this bolt hole.
Top alternator bracket
Top alternator bracket with broken-off stud

  •  I also removed the breather hose - The breather hose is tapered from 3/4" to 1/2" (inside diameter) and is 4" long.

Atomic 4 Breather tube
Breather hose

[All of the posts associated with this rebuild are available under the search label Atomic 4 Rebuild.]

Monday, December 16, 2013

Atomic 4 rebuild - Removing coil and distributor

I am continuing to remove the miscellaneous pieces from the outside of the engine. I have started making detailed labels and notes and pictures for each piece that I am removing since I am not comfortable yet in my ability to remember where things should go and what fasteners are needed. I have been grouping like-parts into large ziplock baggies and organizing these in order. So far this has minimized the chaos of miscellaneous bits and pieces in my [cluttered] garage. 

  • Labelled, and removed ignition wiring. I left the spark plugs in for now since they provide some protection from grime and they aren't in the way. 
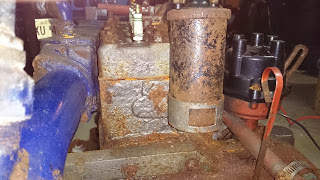
  • Removed the coil from the back side of the engine. Two 1/2" bolts hold the coil bracket in place. One was missing. I will need to re-tap the corroded thread of the missing bolt before re-assembly. 
Atomic 4 Ignition coil
Ignition coil
  • Removed the distributor cap. Both screws will need to be replaced.
Atomic 4 distributor
Distributor without cap
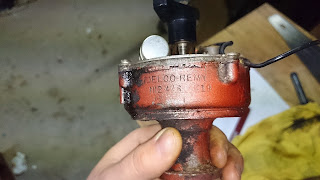
  • Removed the distributor. There is a bracket midway up on the distributor that holds it in place. Once the bracket is removed (single 1/2" bolt) it slides easily out. The distributor on my engine is the Delco variety, as opposed to the pre-1969 Prestolite ones. 


    Delco Distributor
    Delco Distributor 

    Delco Distributor
    Delco Distributor with bracket

[All of the posts associated with this rebuild will be available under the search label Atomic 4 Rebuild.]


Sunday, December 8, 2013

Atomic 4 rebuild - Removing and testing the starter

Starter on engine
The starter is held on with two 9/16" bolts. Remove these to remove the starter.

There is a great video on bench testing a starter here:

Following the directions in the video, these are the steps that I took to test:

  • Attach a switch between the ignition terminal and the positive terminal on the solenoid.  The ignition terminal is the one with an "S" beside it. 


  • Attach jumper cables from the battery to the positive terminal on the solenoid and the negative to a bolt on the body of the starter. 
  • Test
My starter tested fine. Here is the video of my test:


[All of the posts will be available under the label Atomic 4 Rebuild.]

Atomic 4 rebuild - Removing the flywheel

Atomic 4 front view
 Removing the flywheel is straight forward.

  1. Remove the front cover of the engine by removing the six 7/16" bolts around the cover.
  2. Remove the flywheel by removing the six 9/16' bolts. You might need to secure the flywheel from turning by bracing it with a large screwdriver. (mine came off easily) 
Keep track of all pieces and bolts by placing them in individually labelled bags or trays!


[All of the posts associated with this rebuild will be available under the search label Atomic 4 Rebuild.]


Flywheel cover removed
Flywheel removed


Friday, December 6, 2013

Atomic 4 engine identification - Serial number and build date

In order to find parts and details on the specific setup of the Atomic 4 it is important to know the date that the engine was manufactured as well as the serial number. Parts guides and tutorials will usually reference one of these numbers.
Example from Manual

Both are located below the breather hose, on the right side of the engine. The build date is the top number and is in the format MMDDYY. The serial number is the 6 digit number directly below.

Atomic 4 serial number and build date

[All of the posts associated with this rebuild are available under the search label Atomic 4 Rebuild.]


Atomic 4 Rebuild - Introduction

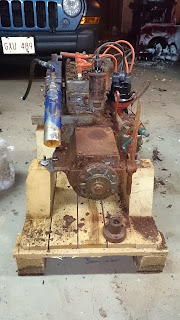
Atomic 4 - right side with serial number

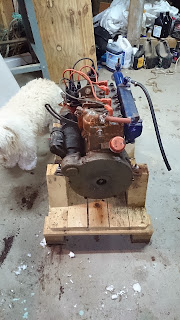
Recently I came into possession of an Atomic 4 engine. A local sailor upgraded to a new boat and had a spare engine from his old boat that he had intended on rebuilding. I am taking over the rebuild project.

Goals

I have a few goals for this project:

    Atomic 4 - frontAtomic 4 - left side
  1. Increase knowledge: Increase my knowledge of Atomic 4 engines so that I am more capable of troubleshooting and repairing my boat when needed. I am not mechanically inclined but need to be more self sufficient given my desire to cruise further in this boat.
  2. Spare: Given that my current A4 is 42 years old, a spare is important to avoid lengthy losses in precious summer boat time.
  3. Upgrade: Assuming that I am successful in this build, my plan is to eventually swap this new engine with my old one to provide more reliability and performance.  Not that my engine has been particularly problematic, it has been reliable for the most part.

Mechanical ineptitude 


Ineptitude may be a little strongly stated, however, I have very little mechanical experience. Over the last few years I have tried to increase my knowledge of engines and marine systems and I have successfully done some maintenance and repair jobs on my A4 (thermostat and exhaust manifold were the big ones).

All of this is to say that this engine rebuild will be completely new ground for me. While this is a great experience for me, it does mean that you should take my techniques, suggestions and recommendations with a BIG grain of salt. Talk to a mechanic if you want real advice!
Atomic 4 - back


My primary resources, initially, for this project will be:
THE COMPLETE OWNERS & SERVICE MANUAL FOR THE 
UNIVERSAL ATOMIC 4 GAS ENGINE

Engine Builder's Handbook

I will chronicle this rebuild as detailed as possible so that others might find something useful out of it. All of the posts will be available under the label Atomic 4 Rebuild.


Monday, November 4, 2013

Standing desk

Standing deskLike most people in IT, for that matter anyone that is tied to a desk for work,  I have noticed that I am achy and uncomfortable after a few hours of work sitting at my desk. I've also read the studies that have shown that working at a desk is a sure fire way to reduce the longevity of my life.

I have tried stretching and getting up and walking around regularly. That helps but it hasn't solved my achy problems.

After reading many posts and study results I am convinced that standing and walking desks are a good solution to the problem.

Phase 1 of this is a standing desk. I am planning on using my standing desk for 1 month to see if I like it and if it helps comfort. I am going to use it at least half of the day every day that I am in the office.

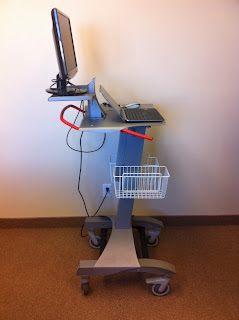
The standing desk that I have is a Jaco SL that I modified slightly. I removed the monitor stand, keyboard tray and PC tray.

Phase 2 will come next month (or whenever I find a cheap treadmill).

I will update with my progress.

Saturday, November 2, 2013

Atomic 4 Thermostat cleaning

While investigating cooling issues in my Atomic 4 I came across an FAQ at the Moyer Marine site that described cleaning the thermostat every season. "It really is better to use a thermostat in the Atomic 4, and to keep it clean by soaking it in vinegar every season." 

While I have had my thermostat out annually for winterizing, I have never cleaned it. So I decided to give it a try.
Atomic 4 Thermostat
Half way clean, after 2 days soaking in vinegar
I had no idea how dirty the thermostat was! In fact, I though that the thermostat had been rusty but, now that it is clean, I realize that the rust was just gunk. 40 years of gunk took 3 days of soaking to clean (and 3 changes of vinegar).

I also wasn't sure what temperature rating my thermostat was rated for so I tested it by boiling it.

Boil testing Atomic 4 thermostatBoil testing Atomic 4 thermostat

The thermostat started opening around 125 degrees Fahrenheit and was fully open around 160 degrees.It was approximately 1/4" open at it's fullest. I'm not sure if either of these are measurements are within spec because I can't find a good reference online. If anyone knows, please comment below.

I'm not sure if my dirty thermostat was the cause of my cooling issues but it couldn't be helping.

Friday, June 7, 2013

Electronics makeover - Part 1 - Radar mast

My radar mast was purchased second hand (Kijiji is my heroine). While it was a great deal ($50) it didn't quite fit my boat. The first step in my radar installation process was to adapt this radar mast for my use.
Radar mast

Cut off existing mounting points and brackets
The mast had existing mounting brackets welded in places that aren't suitable for my boat. I cut these off using an angle grinder with a metal cutoff disk. It was very quick cutting through the aluminum...Careful not to take off too much! I also took this opportunity to sand off the existing paint and smooth out the overall surface of the mast.

Create and install mounting bracket for GPS receiver
Using a combination of a bracket that was on the original radar mast and some aluminum plating that I had laying around, I created a nice little mounting bracket for the GPS receiver. Basically I just formed the plating into a two piece circular mounting bracket using a piece of 2" pipe as a form.

Prime and paint
I used automotive aluminum spray cans to prime and paint the while unit. The paint seems very durable. We'll see if it holds up.

Deck Installation
To install the mast I used a 3x6 (1/4" thick) piece of aluminum as a backing plate and a pivoting bracket at the base. I drilled holes to accommodate the 1/2" stainless bolts that would secure the mast to the backing plate. I applied silicone sealant to the bottom of the mast and around the screw holes to prevent water leakage.

Rail bracing
Using more spare pieces of aluminum, some bits and pieces from other clamps, and a hose clamp, I attached the mast to my aft safety rail. This is still pretty ugly and I need to come up with a better clamp here.

Extra bracing
I quickly realized that the mast still did not have enough stability. I created an additional diaganol brace from my GPS mounting bracket to the cabin deck on. I used a piece of 1" aluminum tubing for the brace. I think it could still use one more brace on the other side but I'm going to wait and see how it performs first.
Installation of gear
I installed the radar and GPS receiver using the provider hardware. I did realize, after the fact, that the hole that I had drilled for the cabling wouldn't accommodate the GPS connector. I had to make some last minute modifications to get it to fit.


If more detail on any of these steps would be useful to you, ask for clarification in a comment below and I'll update with the further detail.

Monday, March 11, 2013

H29 Layout in Vector Format

I am currently planning some major electrical work on Salammbo. To help diagram this I thought it would be nice to have a clean, scalable layout diagram to use. Since the only diagram I had available is the one located here, I thought it might be good to do up a quick vector based version.

Note: The scale isn't confirmed as accurate but looks close.


You can use an open source editor like InkScape to manipulate this file.

I will post my electrical plans once they are completed.

Wednesday, January 23, 2013

Choosing a new radar system

Radar and Chartplotter
SI-TEX Radar with Standard Horizon CP190i Chartplotter
Living and boating on/near the Bay of Fundy means that fog is a regular problem. With this in mind, I have been looking to purchase a radar system for the last couple of years.

Neither Kijiji nor eBay offered me any real bargains in my hunt so this winter I got serious about the search and looking for new units.

Current Setup
My current electronics are very simple, yet effective. I have an old Magellan 315 handheld GPS, supplemented by an iPhone 4 with charting apps (Navionics). My depth finder is a vintage SeaFarer 3 that looks like something from an old James Bond movie.

This setup isn't fancy but has proven very effective.

Criteria for Radar 
Given the success of my current setup my only real criteria for a new radar system was...well...that it does radar! A few other criteria that factored in:

  • Inexpensive - The new system should be worth less than the boat floating it
  • Relatively small dome
  • Relatively small display that will fit in my available bulkhead space
  • Options for charting  (Not mandatory)
  • Options for adding depth sounder (Not mandatory)
The options
I soon realized that a single purpose radar screen, while available, isn't very cost effective. For a small amount more a chartplotter can be included and offers many more features. I quickly changed tack to focus on chartplotter integrated options only. 


Each of the main manufacturers have similar offerings for chartplotters. They range from simple units to high-end large display units with tight integration with...everything. Of course each does there thing in their own proprietary method (I'll save that rant for another day).

For radar domes there are a few options but basically it comes down to the High Definition/Broadband options or standard models. Within each category you can choose between low-end systems with limited range or higher-end devices with longer range and better overall performance.

The Decision
I was VERY tempted to buy some of the higher end units. There are all kinds of features that are available for "just a couple hundred more". Looking at each unit and the next one up ...and the next one up, it is easy to get pulled into the cool features of the more expensive units.

In the end I dug deep and really analyzed my requirements. When it comes down to it, I expect to be out on the Bay [perhaps] 2 weeks a year. The rest is on the protected Saint John River system. Of those days on the Bay, only a few will be foggy and usually I would just wait out the fog at anchor.

Do I really need all of the extra features for that minimal amount of usage?

Also, I really don't have a great desire to install windmeters, fuel indicators, water level gauges or other electronics that would tie into a chartplotter. So the integration piece isn't important to me.

My final choice was to keep it simple, keep it cheap and go with a SI-TEX MDS-1 dome with a Standard Horizon CP190i chartplotter. This is about as basic as it gets for a chartplotter/radar combo.

I did a LOT of price comparison. I shopped around and compared prices at practically every online vendor in North America. I really expected that Amazon, Overtons or another large US retailer would be cheapest.  In the end I purchased the unit from the local Halifax merchant The Binnacle. Their prices were second to none since the unit was on sale and since they offer free shipping. They have also consistently given me stellar service. In the end $1807 (including tax) got me my new toy.

The success of my plotter choice should clarify over the coming year. I will include details of my installation as well as my review of the product choices as I use them.

If you have opinions about these units, boat electronics...or anything else, please leave a comment.