Wednesday, October 3, 2012

Airhead Composting Toilet - Year 1 review

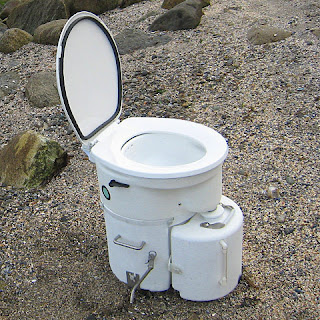
The boat is out of the water, we've started to do our winterizing and it's time to sit back and reflect on our new place for sitting back and reflecting. Our composting toilet. As you may recall from previous posts, I installed an Airhead composting toilet this spring.

Overall our experience with the Airhead has been very good. We used the boat 1-3 days per week throughout the summer, averaging four people onboard. We also had a full 6 day cruise with the family, in the middle of the summer, that was a true test of the system.

Using the Airhead

We have had almost no issues with using the Airhead. We do make sure to take a couple of minutes to orient guests on how to properly use the system but, really, it is dumb simple. 

The only use problem that we did have was with a younger child who insisted on opening the solid flap when it was a liquid job, if you know what I mean. That resulted in a smelly slurry being formed in the solid bin after a weekend of misuse. Adding extra peat moss solved the issue fairly quickly (a couple of days). 


Cleanliness 

We had no cleanliness issues. A quick wipe down on occasion and a spray bottle of water for occasional use kept the unit very clean. 


Emptying the unit

I found that we had to empty the liquid tank approximately every 1 1/2 days with 4 people on the boat. This varied a bit depending on the amount of beer being consumed! Emptying the liquid tank is quick and easy. Don't wait for it to get full in the middle of the night though! 

We did have to empty the unit near the end of August. I'm guessing that we could have gotten through the rest of the summer had we not had the above-mentioned 'slurry episode'. The extra peat moss added a lot of volume. Regardless, emptying the unit, was straight forward and no more difficult or unpleasant than a single pump-out would be in a standard holding tank setup. We emptied the contents into a doubled compostable garbage bag. We've set the bag behind our garden to give it some time over winter to fully compost.  


Issues

There weren't many issues but there were a few:

  1. Exhaust fan - The exhaust has stopped working 3 times throughout the summer. I simply had to take the vent housing apart and give the fan a little turn manually and it would start spinning again. I presume that there was little bits of dust that were clogging the fan. Perhaps a stronger fan motor would be in order. (Update [10/8/2012]: This part is under warranty and will be replaced by Airhead) 
  2.  Liquid level indicator - There is a little clear tube that shows the level of liquid in the tank. It regularly gets clogged by small bits of crud that end up in that tank through normal use. Don't rely on the little tube to tell you the bottle is full! 
  3. Agitator - The agitator inside the solid tank doesn't always stir the full contents of the unit. This only became apparent as I tried to add peat moss to fix my slurry issue. Not usually an issue.

Conclusion
I would recommend an Airhead to other boats (I regularly do!). It certainly beats our old holding tank system. It is easy to maintain and use. It is also a good conversation piece!

If you have any specific questions or comments about our experience with the unit (or anything else), please comment below. 

Friday, May 11, 2012

Composting Toilet Installation

Installation of the composting toilet itself is pretty straight forward. Much more effort was required removing the old toilet and adjusting the floor than was required for the actual installation of the toilet.

    Remove the existing toilet system parts, including:

    • Holding tank
    • Holding tank pump piping
    • Y-valve
    • Toilet and piping. Removing the toilet itself proved most difficult since the bolts holding it in place were stripped. A hacksaw was the final solution.

    Test fit
    Test fit the Airhead toilet. The back few inches of my head has a significant sloped area. This greatly reduces the working area of the toilet. After test fitting I decided to add a raised floor so that I could get the maximum front-to-back clearance.


     Make raised floor.
    I made the raised floor out of 1/2" plywood, cut to shape using a cardboard template and supported by 1x3 spruce boards. I stained and varnished the floor to match the rest of my bright-work. I used brass L-brackets to hold the raised floor in place. This will allow for easy removal if I need to get access below.

    Install Airhead unit. The toilet unit itself is literally as easy as screwing in 4 screws into the two brackets.
    Installed with raised floor

    Install air fan. I have an existing cowl vent into the bathroom. I simply screwed the fan assembly on top of the existing vent whole.
    Fan assembly attached to cowl vent

    Run vent hose. I used 6 feet of vent hose and simply attached it to the wall with 1 1/2" plastic pipe brackets. Once the pipe is tucked in properly it isn't as ugly as I expected.

    Run wiring.  I used standard 14 gauge wire (overkill I think) to wire directly from the fan to my auxiliary battery. I have two medium sized solar panels that keep up the charge on the battery. I don't even notice the load of the vent fan on my electrical. 

    Test run! I will update later with my production review of the toilet.

    Wednesday, May 2, 2012

    PVC Pipe Winter Boat Cover Frame


    After several years of mediocre success covering my boat with a traditional wooden boat cover frame, last fall I decided to change it out for a frame made from PVC pipe. Now that it is spring and the frame and cover have survived the winter flawlessly I figure I should share my design.

    I decided to use 1 1/2" PVC pipe since it is only a little more expensive but much sturdier than 1 1/4" pipe. I also made the arbitrary decision to space my supports at 3'.


    1. Determine the number of supports by dividing your boat length by 3. 
    2. Take a width measurement at each support location.
    3. Use a Triangle Solver or some basic trig to determine the lengths of pipe required for each side given width and the angles (90 and 45 degrees).
    4. Cut the pipe to length
    5. You will also need to cut 3' lengths of pipe to go between each support and a length of pipe for each end.
    6. Make the top 90 degree connector
      1. I used a single 90d PVC female-female connector attached to a female-female straight connector with a machine screw.
      2. Drill a hole in the center of the 90 and straight connectors.
      3. Attach them together using a screw and nut.
      4. I also drilled holes close to the edge of each side of the straight connector to fasten the connector to the lateral support pieces.
    7. Glue the entire support structure and connectors together using PVC pipe glue.
    8. Assemble the whole thing together with pipe glue using the vertical supports and the 3' PVC pipe sections. Do NOT GLUE!
    9. Use additional screws to hold the 3' pipe sections into the connectors.
    10. Cover the connectors with foam to prevent tarp chaffing. 
    11. Use tie-wraps to secure the frame to lifelines or whatever else you have that is sturdy.

    This whole project took approximately 2 hours once I had the design figured out. Assembly took approximately 30 minutes. That is a far cry from the hours that my previous wooden structure took to assemble.

    The slope of the frame seemed sufficient to keep snow from piling up on top. I didn't have to shovel it at all through the winter.

    Wednesday, April 4, 2012

    Prop Nut Zinc Anode

    My Hughes 29 has spent the vast majority of it's 40 year life in fresh water. Apparently electrolysis is still possible in fresh water but it certainly isn't fast acting. My boat hasn't had an anode installed (in recent history anyways) and shows no sign of corrosion. However, I do plan to hit salt water so I have been on the hunt for an appropriate anode.

    The problem with the Hughes 29 boats (confirmed by other owners that it's not just mine) is that there is very little clearance between the prop and the shaft housing. On my boat there is only 3/4" clearance.  That isn't enough room for a standard shaft mount anode. 

    After much searching, I found a source for an anode that would work. It is a  prop-nut mounted anode.  The following are the part number and spec for the anode. 


    CMPNCC10 - For 1" diameter propeller shaft. Complete set, zinc and bronze nut.

    Shaft Size: 1" (25mm)
    Length: 3" (76mm)
    O.D: 1 7/8" (48mm)
    Weight:  1.38 (0.63kg)
    Thread Size: ¾"NC10
    O.D.: 1 7/8" (48mm)
    Fastner: 5/16-18x1 socket head w/patch

    These anodes are available online at The Binnacle.

    Monday, March 5, 2012

    Why choose a composting toilet for your boat?

    The Preamble
    I've recently decided to replace the toilet and holding tank system in my Hughes 29.  This is the first of a series of posts that I am doing to outline my purchase decision, initial review (pre-installation), installation, short term review and finally a long term review. I will update this initial page with links to the other posts as I get to each step. I've also created an initial review of the [good] purchasing experience on my customer service blog here.

    Some background
    My Hughes 29 has a standard, manual pump, Jabsco marine head. This attaches to a Y-valve that has the option of either pumping directly overboard or pumping into a ~10 gallon soft holding tank (bag). I don't like the idea of pumping overboard and I try to avoid it as much as possible. So that leaves only the storage tank.

    I have had my sailboat for 3 years now. Since the first weekend on the boat I have had issues with the head smelling. I have tried tightening fittings, adding additives to the holding tank and frequent pump-outs but I still have a lingering smell problem. Sometimes it is tolerable, other times not.

    Last summer things came to a head (sorry!) because the only two pump-out stations nearby were both out of service for most of the summer. While I still had the option of dumping overboard, once the bag got full, that didn't alleviate my problem of having a large bag of sewage sitting under my bunk for most of the season. (I have no overboard pump connected to my tank.)

    A solution was needed. 

    My first reaction was to simply start from scratch and put in a new toilet and holding tank. I removed all of the pieces of the system last fall with that intention. I didn't want to start with any of the old components because I didn't want to risk a remaining piece being part of the problem. Then a few months ago I stumbled on the [seemingly] magic of the composting toilet.

    First things first, why a composting toilet? Here are the purported benefits (according to my research and vendor sites):

    • Odorless 
    According to all of the posts that I can find and the vendor documentation, these things are supposed to be odorless when they are installed and used properly. This was my #1 requirement. Apparently it is the separation of solids and liquids, along with the venting system that allow this.
    • Infrequent emptying of solids
    The leading vendors claim, and posts online seem to re-enforce the fact that you only need to empty the solids bin once or twice in a summer season (every 3 months for a live-aboard). Liquids are separated and need to be emptied every couple of days. I can live with carrying a bottle of pee onshore every couple of days. 
    • Space savings
    I really like the idea of reclaiming all of the space that my current holding tank takes under the front v-berth. The toilet itself is only 1 1/2" larger in each direction than my current Jabsco toilet. 
    • Easy installation
    Compared to changing out all of my current piping, installing a new tank, venting, and a manual overboard pump-out solution (a requirement in my view); installing the composting toilet will be a breeze! Simply bolt it down.
    • Environmentally friendly
    While I am very conscious of the environment, this isn't a huge factor in the decision for me. I don't believe that my boat (and small amount of discharge) is any more than a drop in the bucket compared to the local municipalities that dump [mostly untreated] waste into the same river system and harbour. But, it is a nice-to-have. 
    • Cost
    The vendors claim that their composting toilets are cheaper to install than a traditional system. I don't really believe that. The full cost of the composting toilet is around $1000-$1200 (after taxes and shipping). I can install a new version of what I have for around half that cost. 
    • Less maintenance
    Anything that can save maintenance time on the boat is worth its weight in gold. I don't mind doing maintenance but that isn't why I have the thing. Less is better.

    The two main vendors that I examined (that were in my price range) were:

    These vendors appear to have similar products and each has good reviews in the Internet forums. I chose Airhead because of the resoundingly good customer service stories that I heard. That is important to me

    Stay tuned for my future posts about my Airhead. Time will tell whether this decision was as good as it seems.

    Saturday, February 25, 2012

    Driftwood and Tile Table

    I built a kitchen table several years ago and people rave about it so I thought I should post the design and details. This table is large, heavy and a now permanent fixture in our kitchen. You should only make one of these if you don't plan to move it often. It is heavy...but pretty darn cool looking!

    This project wasn't difficult, if you try it please comment below with your thoughts on how the design can be improved or post pictures of your table project.


    Steps


    Find some driftwood! I found a large driftwood log that was between 7" - 10" in diameter on a beach on the Saint John River. This is very old wood and I have no idea what type it is. Make sure you dry the wood thoroughly. This might take several weeks or longer depending on how wet the wood is when you find it. My opinion is that the uglier the wood is the more character the table will have.


    Trim the legs to the right length. Trim all of the legs to the same length and level them as best as you can. They won't be perfectly level probably but that can be corrected later. Use a reciprocating saw with a long blade, hand saw or chain saw for this task.

     Attach the sqaure leg base to the leg. In order to secure the leg to the table you will need a piece of wood attached to the top of the leg so that you can bolt that to the table. I used left over 3/4" plywood and screwed and glued the piece to the top of the leg. Use long, large screws and good glue or epoxy since the legs will take a lot of stress. I used thickened epoxy and 4 screws per leg.

    Cut the table top.  The table size can be whatever you want for your space. We host a lot of dinners so wanted it larger than normal. Cut your 3/4" plywood to the correct size (and adjust other measurements as required if it is different than my size).

    Attach Bottom boards. The 1/3" pine board around the outside gives a lot of extra strength to the table. Make sure you attach it with good glue (or epoxy) and plenty of screws so that it is strongly attached.

    Attach the legs to the tabletop. Use lag bolts to bolt the legs to the tabletop. Make sure that the head of your bolts are sunk flush with the top of the table. Use bolts so that you can tighten the legs as materials shrink or move.

    Attach decorative trim to the table edge. Make sure that the trim is higher than the top of the plywood, the height of your tile, so that the tile will butt against the trim at the same level.

    Tile and Grout. I used 12" ceramic floor tile and made the pattern shown. Any tile should be fine. I like the floor tile because it is practically bomb proof. We hardly ever use coasters for our pots or hot dishes, we cut directly on it, etc. (note that there is a chance that the tile will crack if you put hot items on cold tile but we haven't had that issue).

    Put felt pads under the legs. This table is heavy and it will scratch your floor. Use felt pads! They will also help keep it from wobbling if your legs aren't perfectly cut (which is harder to do than you think because of the wonky shape of the logs)

    Leave me a comment below if you have any questions about this project.


    Thursday, February 16, 2012

    Creating Adventure Race maps with Trimble Outdoors

    I have recently finished creating my first race course, and map, for a 5 hour adventure race (Nine Toe Winter Run). When I set out to complete the map I thought it would be reasonably straight forward process. I thought I would simply hike the course, import the GPX into some magical app and, voila, it would spit out a course.

    The reality was quite different. I came to discover that there is no magic course building app. There really isn't any app that is well suited for creating Adventure Racing maps at all (if you do know of one, please comment below, I'd love to know about it). I tried several apps by Garmin, Google Maps, GPX Editor and several others with no great amount of success. 

    The basic problem to be solved is, combining many different GPX trails (but not necessarily joining them), many checkpoints and presenting them with numbered pins on a detailed topo map.

    My final solution ended up relying on (surprisingly) an online map editor available at Trimble Outdoors. Their application isn't perfect (more on that below) but it did get the job done. I came across their application because I use their iPhone app AllSport GPS  to track my own training.

    First of all, here is the basic process that I used to create my maps:

    • Capture GPX files
    I used a combination of AllSport GPS (on IPhone) and a Garmin handheld GPS. I captured each trail section as a separate GPX file so that I could choose which final trails to include on the route map.
    • Create a new map in TrimbleOutdoors

    • Upload each GPX file into the Trimble map   

    The little camera button allows for file uploads, including GPX.

    • Correct the trails
    I found that most of the routes that I imported had stray points that created extra pieces on trails that don't really exist. Each of these had to be individually corrected. This is the most tedious part of the process in Trimble.

    First, select the trail in the right hand list of trails. You, unfortunately, can't just click on the trail in the map. Once you have selected the right trail name you will be able to mouse-over the trail and it will give you a little square that you can click on to edit an individual point.

    I found the easiest way to remove large sections of tracks (for example, if you had overlapping tracks) is to first "Split Track" and then to delete the newly created section. This is, by far, the most tedious part of the map editing process. Hopefully they will improve this.

    • Name your points 
    When you go to print your map, you have the option of choosing to display your checkpoint names, if you name them properly, they will print nicely on the map.

    • Save and print your map 
    Ideally you can now print your map with the "Print MyTopo" feature. This would allow you to have a nice waterproof map delivered to your house. 

    Unfortunately I had issues getting the map to display properly when I went to buy it. After several attempts with their support (and long wait times) I gave up. 
    [Note to Trimble: That was a lost sale that could have been avoided]

    Instead, I had to print the maps myself. I found that the map labeling wasn't working properly when I did the printing from the site. So instead, I did a print preview using the MyTopo printing feature, did a screen capture using  Screenpresso and added the checkpoint names manually.

    I printed my maps on Rite-in-the-Rain waterproof paper.


    Things that should be improved in the Trimble Outdoors map program:
    1. The map editor should have an option for importing existing routes that are in the database. I had to export GPX files from the Trimble app and then turn around and re-import them into the race map. 
    2. Make it easier to select tracks. When there are a large number of tracks on a map it is difficult to figure out which one is which.
    3. Make it easier to delete multiple track points at once.
    4. Make the MyTopo print integration work!
    5. Enable version control. People make mistakes, let them save versions so they can correct mistakes easier.
    6. Allow track coloring

    Monday, February 6, 2012

    Tassimo - A bad idea made worse

    A few years ago we switched our office coffee maker from a regular drip coffee maker (with fresh ground beans) to a Keurig machine. I tend to lean towards the tree hugging side of values so I had some issues with this new machine. The Keurig is wasteful. However, everyone in the office loves the thing so I accepted it.

    Fast forward two years. Christmas of 2012. I, and I'm sure millions of others, found a Tassimo machine under the Christmas tree. Specifically I received a Bosch T20.

    Now, I admit that the Bosch machine is a sexy bit of technology. It is a sleek design and it is easy to use. However, that is where the good story ends. My experience with the Tassimo system has not been great.

    First let's talk waste. While the Keurig is a fairly wasteful system, the Tassimo takes this to an exceptional level. With the Keurig I can get a full cup of coffee out of a single K cup. The Tassimo makes a half cup of coffee and it often, depending on the flavor choice, takes two of their T DISKs for the half cup. As shown in my post picture, two make coffee for a couple of friends it creates a mountain of T DISKs.

    Neither the Tassimo T DISKs or Keurig cups are recyclable, re-usable or compostable. Millions of these things are being used daily (I'd love to know the number) and non of them are recyclable. The best you can hope to do is pry off the aluminum covers and compost the grounds. (I've tried this and it is a pain)

    Next, let's talk cost. I used to buy bags of unground coffee beans. If you buy a good brand, it will cost you around $10 for enough beans to last a week or two. These T DISKs are brutally expensive. Depending on the flavor you can pay between $0.50 and $2 per cup. We've found that COSTCO gives the best deal on them but it still is crazy expensive compared to beans.

    Last, let's talk flavor. I've had reasonably good success with the Keurig coffees. They are consistently mediocre and occasionally pretty good. Despite the hyped technology of the Tassimo, the results have been overall pretty poor. I think the best example of that is the hot chocolate. My daughter wouldn't drink her Cadbury hot chocolate from the Tassimo. If a little girl won't drink hot chocolate it has to be bad. She is usually very happy drinking the cheapest No Name brand stuff, yet this $2 monstrosity went down the drain.

    We have 4 boxes of T DISKs left in our cupboard. When those are gone our Tassimo machine is going in the closet. Back to the bean we go.

    Wednesday, January 11, 2012

    Focusing on service

    http://staying.afloat.ca
    I have been blogging on this site and posting content for approximately 2 years now. I enjoy creating this content and hope that it is interesting. Originally I started this blog as an experiment in blogging, SEO and advertising. Since I hadn't had any exposure to these areas I thought I should try it first hand.

    I've been pretty happy with the results. I have a fair number of hits every month but, more importantly, I've gotten some excellent feedback on some of the articles I've written (especially the ones on boat building and my loft bed plans).

    However, I've decided that I would like to write more about a career oriented passion of mine, service. Service quality is something that I deal with daily at my job. It is something that I spend a lot of time thinking about and I've come to have opinions about.

    So, I have launched a sister site called "Staying afloat" (a play on words on my domain name and the topic). I will continue to post to this site with items that are related to general life, music, sailing, boat building and similar content. However, I will start posting (hopefully regularly) to the new site.

    Come visit Staying Afloat (http://staying.afloat.ca) if you have an interest in service delivery and customer satisfaction. Otherwise, stay here and continue to enjoy this less focused content.

    Monday, January 9, 2012

    Vibram FiveFingers - A nice idea but...

    I saw a review on Michael Hyatt's site of his experiences with Vibram FiveFingers. I thought this would be a good opportunity to update my own review.

    I have had my FiveFingers for almost 2 years now. Initially I was using them as my exclusive running/training shoe. I bought them in January and ran in them exclusively until April when I experience some foot problems. This actually turned out to be a fracture caused by repetitive stressing of my foot bones.  This was a prime example of training in them too hard to quickly. While I thought I was easing my way slowly enough into longer distances, the break tells a different story.

    Once I recovered from my break (8 weeks later) I took a hiatus from my Vibrams. I was a little gun shy. Eventually I pulled them on again a couple of months later and remembered why I loved running in them. However, I have kept them as a secondary part of my training. I run in them on a semi-regular basis as a supplement to my training rather than a primary trainer.

    There is no doubt that barefoot running is a fabulous way to work muscles that you forgot you had and it has help modify my stride so that I no longer have knee issues. However, I am not convinced that it is the best option for long distance or technical running. I do multi-day adventure racing,  I need a rock solid shoe that I can forget about.

    I have since settled on Solomon XT Wings 2 as my primary shoe. They are a stellar trail running shoe and are almost bomb proof for long hard races. I will continue to use my Vibrams but probably not frequently.