Showing posts with label salammbo. Show all posts

Tuesday, May 20, 2014

Building a new tiller

The tiller on Salammbo was looking pretty decrepit and it was time for either a refinish or a rebuild. Since the tiller had already been fixed at least once in the past, and wasn't looking great, I decided to go new. I also had some nice 1 1/4" thick white ash available from a paddle making project my Scout group did a few years back that I knew would look great as a tiller handle. White ash is strong and durable. 

  • The first step was to simply trace my old rudder onto the stock. I liked the existing rudder feel so have no need to change the shape. 

Tracing the tiller
Tracing the tiller

  • Cut out the rough shape with a jig saw. 

Rough cut tiller
Rough cut tiller
Rough cut tiller

  • I used an aggressive rasp to remove the bulk of the material. A less aggressive file tuned up the shape.
Rasp shaped tiller
Rasp shaped tiller

  • I used a power sander with 60 grit paper to smooth out the rasp marks and followed that up with 120 grit and then 220 grit.


Finished tiller
Finished tiller


Friday, June 7, 2013

Electronics makeover - Part 1 - Radar mast

My radar mast was purchased second hand (Kijiji is my heroine). While it was a great deal ($50) it didn't quite fit my boat. The first step in my radar installation process was to adapt this radar mast for my use.
Radar mast

Cut off existing mounting points and brackets
The mast had existing mounting brackets welded in places that aren't suitable for my boat. I cut these off using an angle grinder with a metal cutoff disk. It was very quick cutting through the aluminum...Careful not to take off too much! I also took this opportunity to sand off the existing paint and smooth out the overall surface of the mast.

Create and install mounting bracket for GPS receiver
Using a combination of a bracket that was on the original radar mast and some aluminum plating that I had laying around, I created a nice little mounting bracket for the GPS receiver. Basically I just formed the plating into a two piece circular mounting bracket using a piece of 2" pipe as a form.

Prime and paint
I used automotive aluminum spray cans to prime and paint the while unit. The paint seems very durable. We'll see if it holds up.

Deck Installation
To install the mast I used a 3x6 (1/4" thick) piece of aluminum as a backing plate and a pivoting bracket at the base. I drilled holes to accommodate the 1/2" stainless bolts that would secure the mast to the backing plate. I applied silicone sealant to the bottom of the mast and around the screw holes to prevent water leakage.

Rail bracing
Using more spare pieces of aluminum, some bits and pieces from other clamps, and a hose clamp, I attached the mast to my aft safety rail. This is still pretty ugly and I need to come up with a better clamp here.

Extra bracing
I quickly realized that the mast still did not have enough stability. I created an additional diaganol brace from my GPS mounting bracket to the cabin deck on. I used a piece of 1" aluminum tubing for the brace. I think it could still use one more brace on the other side but I'm going to wait and see how it performs first.
Installation of gear
I installed the radar and GPS receiver using the provider hardware. I did realize, after the fact, that the hole that I had drilled for the cabling wouldn't accommodate the GPS connector. I had to make some last minute modifications to get it to fit.


If more detail on any of these steps would be useful to you, ask for clarification in a comment below and I'll update with the further detail.

Monday, March 11, 2013

H29 Layout in Vector Format

I am currently planning some major electrical work on Salammbo. To help diagram this I thought it would be nice to have a clean, scalable layout diagram to use. Since the only diagram I had available is the one located here, I thought it might be good to do up a quick vector based version.

Note: The scale isn't confirmed as accurate but looks close.


You can use an open source editor like InkScape to manipulate this file.

I will post my electrical plans once they are completed.

Wednesday, January 23, 2013

Choosing a new radar system

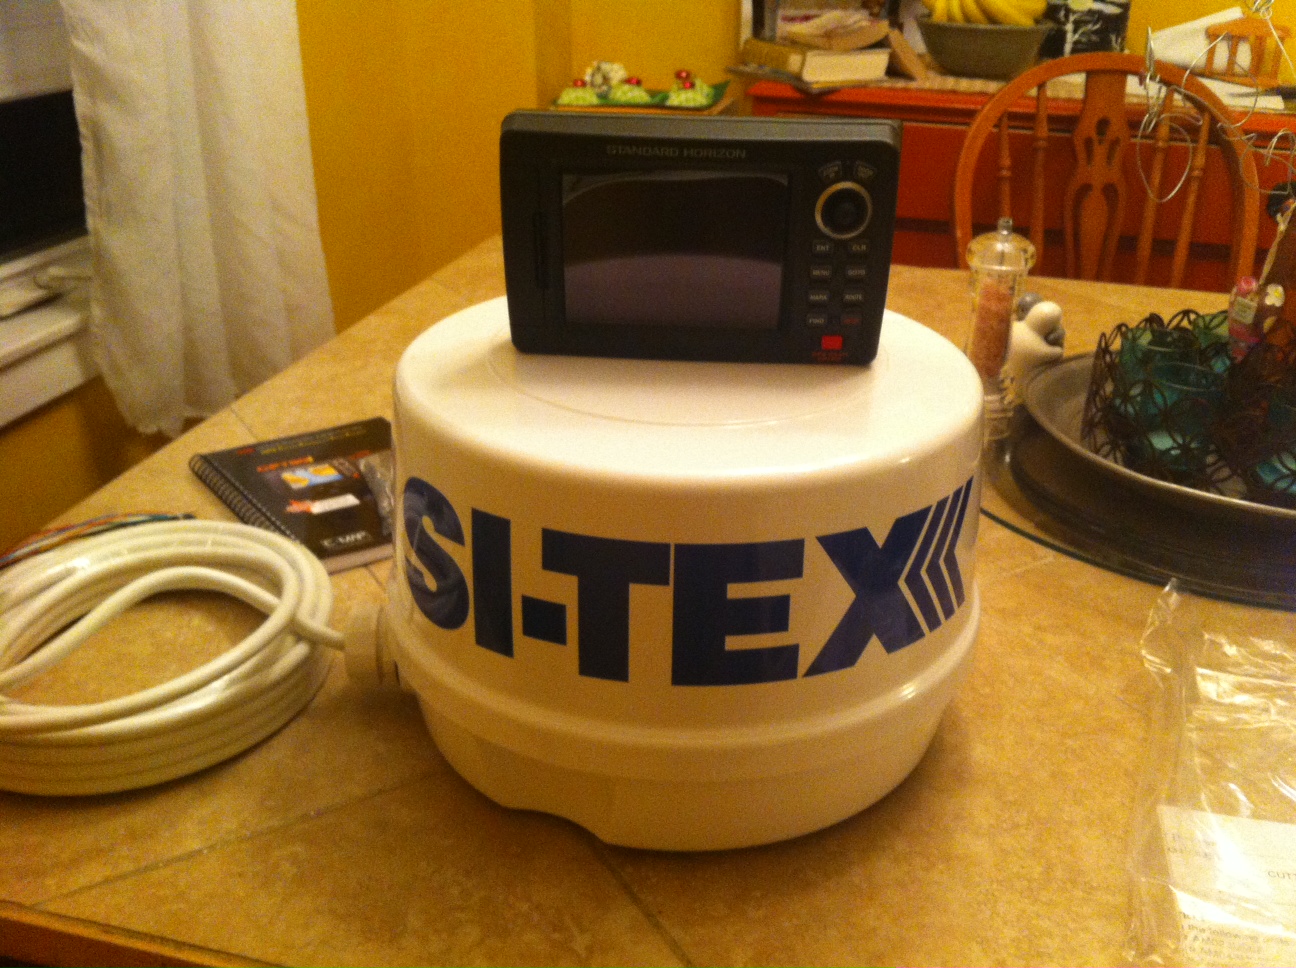
Radar and Chartplotter
SI-TEX Radar with Standard Horizon CP190i Chartplotter
Living and boating on/near the Bay of Fundy means that fog is a regular problem. With this in mind, I have been looking to purchase a radar system for the last couple of years.

Neither Kijiji nor eBay offered me any real bargains in my hunt so this winter I got serious about the search and looking for new units.

Current Setup
My current electronics are very simple, yet effective. I have an old Magellan 315 handheld GPS, supplemented by an iPhone 4 with charting apps (Navionics). My depth finder is a vintage SeaFarer 3 that looks like something from an old James Bond movie.

This setup isn't fancy but has proven very effective.

Criteria for Radar 
Given the success of my current setup my only real criteria for a new radar system was...well...that it does radar! A few other criteria that factored in:

  • Inexpensive - The new system should be worth less than the boat floating it
  • Relatively small dome
  • Relatively small display that will fit in my available bulkhead space
  • Options for charting  (Not mandatory)
  • Options for adding depth sounder (Not mandatory)
The options
I soon realized that a single purpose radar screen, while available, isn't very cost effective. For a small amount more a chartplotter can be included and offers many more features. I quickly changed tack to focus on chartplotter integrated options only. 


Each of the main manufacturers have similar offerings for chartplotters. They range from simple units to high-end large display units with tight integration with...everything. Of course each does there thing in their own proprietary method (I'll save that rant for another day).

For radar domes there are a few options but basically it comes down to the High Definition/Broadband options or standard models. Within each category you can choose between low-end systems with limited range or higher-end devices with longer range and better overall performance.

The Decision
I was VERY tempted to buy some of the higher end units. There are all kinds of features that are available for "just a couple hundred more". Looking at each unit and the next one up ...and the next one up, it is easy to get pulled into the cool features of the more expensive units.

In the end I dug deep and really analyzed my requirements. When it comes down to it, I expect to be out on the Bay [perhaps] 2 weeks a year. The rest is on the protected Saint John River system. Of those days on the Bay, only a few will be foggy and usually I would just wait out the fog at anchor.

Do I really need all of the extra features for that minimal amount of usage?

Also, I really don't have a great desire to install windmeters, fuel indicators, water level gauges or other electronics that would tie into a chartplotter. So the integration piece isn't important to me.

My final choice was to keep it simple, keep it cheap and go with a SI-TEX MDS-1 dome with a Standard Horizon CP190i chartplotter. This is about as basic as it gets for a chartplotter/radar combo.

I did a LOT of price comparison. I shopped around and compared prices at practically every online vendor in North America. I really expected that Amazon, Overtons or another large US retailer would be cheapest.  In the end I purchased the unit from the local Halifax merchant The Binnacle. Their prices were second to none since the unit was on sale and since they offer free shipping. They have also consistently given me stellar service. In the end $1807 (including tax) got me my new toy.

The success of my plotter choice should clarify over the coming year. I will include details of my installation as well as my review of the product choices as I use them.

If you have opinions about these units, boat electronics...or anything else, please leave a comment.

Tuesday, November 2, 2010

Winterizing Hughes 29

I've found some great articles that are related to winterizing the Hughes 29. Although they aren't actually specific to the boat, they are specific to the components.

Here are the steps that I've taken to winterize Salammbo. I'd appreciate any comments on things that I could do better.
  1. Pump faucet and toilet dry
  2. Drained fresh water tank and put in antifreeze.
  3. Pump antifreeze through faucet and into the, now closed, drain.
  4. Pump antifreeze through toilet into both onboard tank and external drain
  5. Dump some antifreeze into the bilge (in case water gets in there and freezes)
  6. Change oil in engine (good reference)
  7. Winterize engine (here's a great site)
Supplies used:

  • 5L 10W30 oil
  • 15L plumbing antifreeze
  • Motomaster fogging spray
  • Gas stabilizer 

Tuesday, August 10, 2010

First weekend cruise - Gagetown

Gagetown, NB is a great little community about 30 minutes drive from Fredericton. Since we are anchored at Douglas Harbour in Grand Lake it was about a 2 1/2 hour sail/motor to get to Gagetown.

The route to Gagetown includes several km of wide open lake sailing followed by a narrow river passages through Cambridge Narrows. The entrance to Cambridge Narrows is tight and extends quite a ways into Grand Lake. Check your chart and watch for the buoys and you'll be ok.  The Cambridge Narrows channel is a little too tight for sailing unless the wind is perfect but it is a nice area to motor none the less.

The town of Gagetown has a public wharf with free public moorings. This is a great place to park for the night since there are plenty of amenities within walking distance. The wharf also includes fuel, water and pump out services.

Our first sail on Salammbo was perfect. We had fairly heavy winds in Grand Lake but the boat handled it with ease. I am used to smaller day sailers but Salammbo proved easy to sail, even in heavy wind and I felt in control.  So far so good.

Thursday, August 5, 2010

SALAMMBĂ” - Hughes 29

I am in the process of purchasing a Hughes 29 sailboat named Salammbo. This is my first cruiser and I'm very excited about the process. I've created a page for her and I will document as much as I can about the boat as I learn about her. I've created a static page for documentation purposes and I'll also write ongoing blog entries tagged with Hughes 29.